General
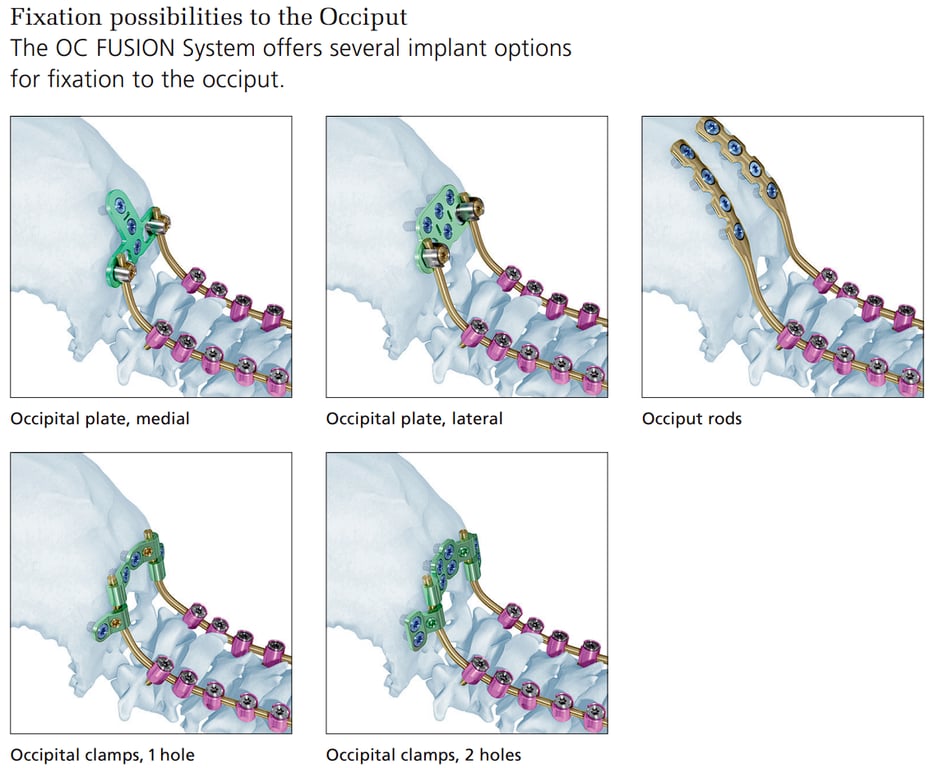
- Various occipital plates exist, most aim to utilize the naturally thickened keels of bone in the occipital region
- The superior nuchal line (with certain transversely oriented plates) or
- Midline from the external occipital protuberance to the foramen magnum (vertically oriented plates)
- The midline occipital keel thins gradually as it approaches the foramen magnum. Bicortical fixation is preferred.
- 1cm below occipital perturbarance inion so that it is not prominent
- The inner and outer tables must be drilled and tapped to allow screw placement.
- If the dura is breached, bleeding or a cerebrospinal fluid (CSF) leak can often be plugged by placing the screw in the hole.
- Contour the plate and/ or smooth the irregularities of the occipital bone to allow the plate to sit securely and snugly without rocking.
Trapezoidal-shaped bone is externally convex and internally concave.
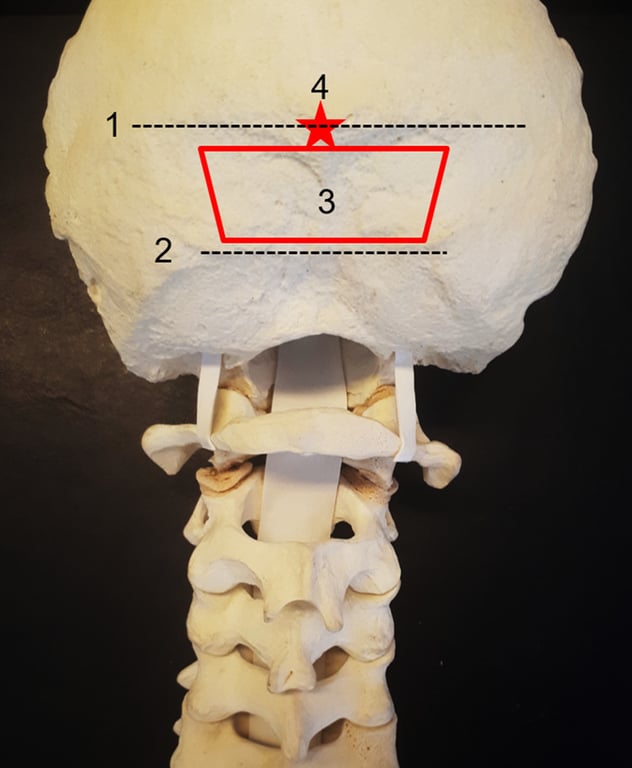
- Superior nuchal line—insertion of the trapezius, splenius capitis, and sternocleidomastoid muscle.
- The transverse sinus and the torcula are internal to this line.
- Inferior nuchal line—insertion of the obliquus capitis superior, rectus capitis posterior major, and rectus capitis posterior minor muscle. We generally perform, when necessary, decompression below this area.
- The “red trapezium” corresponds to the area of preference to insert the occipital screws
- just below the superior nuchal line to avoid a prominent plate, in the midline, where the occipital squama is thicker.
- The “red star” is the external occipital protuberance (EOP), which corresponds to the confluence of the dural sinuses (torcula). inion is the most prominent projection of the EOP
- EOP thickness ranged from 7.4 to 22.3 mm (mean of 14 mm); 1 cm below the EOP, the thickness ranged from 2.9 to 13.4 mm. → must look at scan and measure due to the great variable thickness between patients
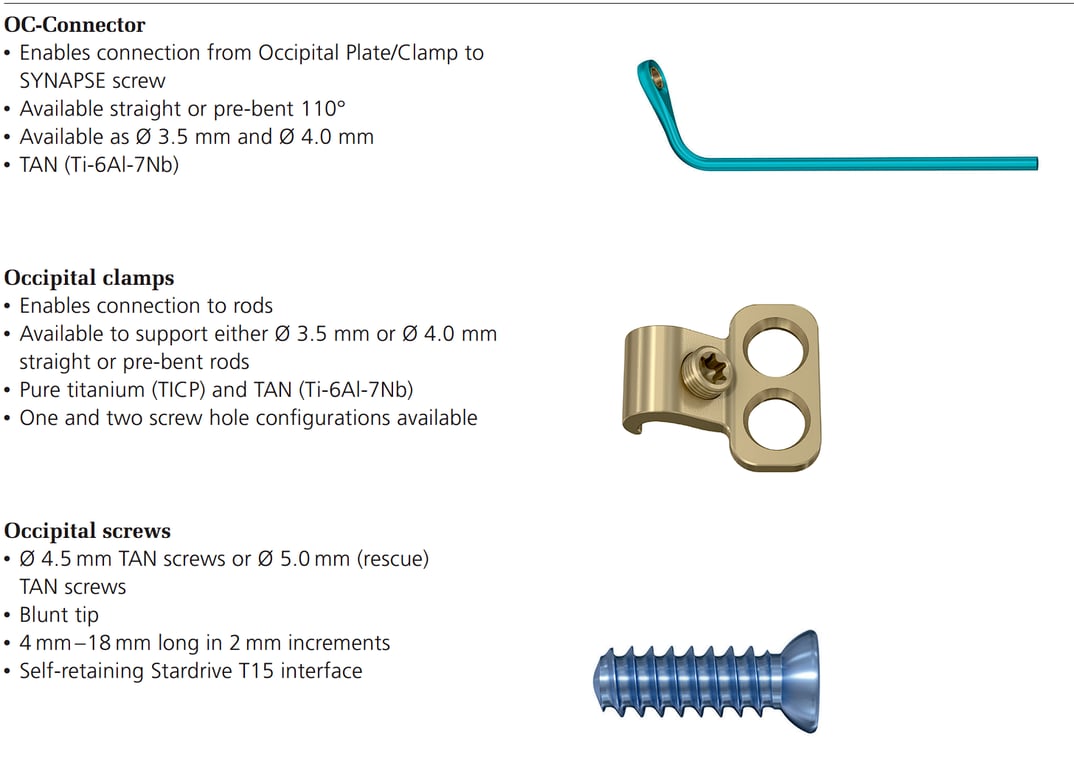
Types of fixation
Positioning
General
- Prone
- Fixed head holder or with tongs for continuous traction with the neck in the neutral position.
- Traction is contra-indicated when the aetiology is a traumatic atlanto-occipital dislocation.
Check Sagittal alignment
Pt should be looking directly at the floor when proned
- Excessive extension or flexion may result in swallowing problems;
- Excessive flexion may result in a spinal deformity where patients compensate by hyperextending the spine or flexing at the knees in order to walk and look straight.
- Obtain a preoperative standing lateral X-ray with the head and neck in a comfortable position for swallowing and use this as a template to compare with an intraoperative lateral radiograph, in order to prevent misalignment.
Alignment
- cervical lordosis (77%) is located in C0-C2
- assessed radiologically via the angle between McGregor’s line and the inferior end plate of C2
- T1 slope correlates with C0-C7 angle (angle between McGregor line and the inferior end plate of C7
- patients with increased T1 slope will require greater C0-C7 angles to mainatina horizontal gaze
Check rotational alignment
- When using traction, pay attention to minimize rotation, which if unrecognised, can go on to affect the final head position;
- the result of a misaligned neck positioned during surgery could result in a fusion with the head laterally rotated.
Decompression
- performed bone removal below the inferior nuchal line.
- The region between the superior and inferior nuchal line is sufficient to occipital plating in the vast majority of the cases.
- The occipital bone is carefully drilled to remove surface imperfections and allow for the plate to lie flat. Minor plate bending is also required in the majority of cases (slight curvature added to the plate).
Technique C0 fixation
- Place plate just below inion
- Drill the occipital bone to flatten it.
- Drill top hole and then place screw
- Drill middle hole and then place screw
- Lastly drill inferior hole and then place screw
- Doing all the holes first can cause the plate to be misaligned
- Use power drill as the occipital bone is hard to drill with hand
- Keep the guide at 8mm and then increase dept by 2mm each time until dura is felt
- Tap the hole
- After placing screws use a torque screw driver to lock it
- With at least three 10-mm screws, it is extremely rare for the screws to fail.
- Notes
- If a large suboccipital decompression has been performed, → not sufficient occipital bone below the transverse sinus for plate fixation → instrumentation at the EOP may be required. (shave down part of the inion to partially recess the plate under the bone to prevent it from being too prominent under the skin)
- It is always preferred to place occipital screws near the midline given that the bone is thickest in this region.
- In patients with occipital dysplasia, such as those with BI and condylar hypoplasia, a vestigial occipital bone may preclude screw insertion below the superior nuchal line.
Rod bending
- Difficult due to multiple angles
- Two bends
- First at C0-C1
- Bend this almost 90 deg
- Second at C1-C2
- The rods should be placed without any tension; sometimes in situ benders are necessary to achieve proper occipitocervical adjustment.
Rod distraction or compression
- Distraction
- distraction on the rods when connecting them from the occipital plate to the cervical screws could be used,
- For
- Cranial settling
- basilar invagination
- Compression
- Vertex compression onto the rods may be required.
- For
- atlanto-occipital dislocation
Technique variation
- Occipital Tethering Technique:
- This technique is utilized when stronger proximal fixation is necessary, such as in cases of severely compromised bone quality or complex revision surgeries.
- It involves placing bicortical occipital screws with an occipital plate, without extending arthrodesis above C1.
- The occipital instrumentation is removed after 6–12 months once fusion is achieved, restoring upper cervical motion.
 Made with Bullet