General
- Aka
- Transpsoas
- Far lateral interbody fusion
- Introduced in 2006
- IOM: Lumbar plexus and genitofemoral nerves.
- if IOM shows deficit change location of needle/retractor.
Indications
- From L4/5 and cranial (Not L5/S1) + any TL spine case with need of access to disc and vertebral body
- Adjacent segment degeneration
- Degenerative disc disease (DDD) with instability
- Recurrent disc herniation
- Degenerative spondylolisthesis
- Grade 1/2 only
- High grades
- The listhesis does not allow enough space for the docking of the retractor safely onto the disc space.
- The lumbar plexus is brought forwards increases risk of injury to the lumbar plexus
- Post-laminectomy DDD w/instability
- Degenerative scoliosis
- Pseudarthrosis
- Corpectomy (tumor/trauma)
- Anterior column realignment
- Discitis
Surgical anatomy
Pre op scan review
X ray
- Identify the ribs 11, 12
- Identify Iliac crest
- L4/5 can be done if the iliac crest is at the level of mid L4 vertebral body and below.
- Address L4-L5 disk space with angled instruments-NOT by table break
MRI
Look at retroperitoneal fat
- If doing higher levels check that there is fat around the kidneys so that it can be push forward for docking on the disc space
- If not fat around kidneys could mean either
- Patient is thin
- Previous surgery in retroperitoneal space causing scaring
Look at psoas
- Psoas is small cranially but increases to the size of the vertebral body at L4/5
- The lumbar plexus
- Transitional anatomy to look out for where at L4/5 the psoas is so large it is more anterior than the vertebral body. This also means that the lumbar plexus which is hyperintense on T2 within the psoas which is normally in the posterior 1/2 of the psoas, is now positioned in the anterior 1/2 of the psoas
Look at Iliac arteries and veins
- Make sure they are anterior to the vertebral body
- Make sure they are not located laterally and between the psoas and vertebral body
- This is important even on the contralateral side as annulotomy of the deep side can damage these vessels
Look at facet join
- Look for fluid in the joint to suggest instability which suggest that there is scope for indirect decompression
- Look for locked facet (over grown)
- Meaning needs direct decompression
Choosing levels and side of surgery
Side of surgery
- If there is fat under the blood vessel the vessel would be mobile
- The plexus is not too anterior within the psoas
- The vessel is on the right side so the left is safer
- Where the bowel is located
- Coronal scoliosis: check where the location
- Side of leg pain: go to the side where the leg pain is worse to reduce risk of causing bilateral leg weakness or leg pain
Cranio-caudal
- L4/5 can be done if the iliac crest is at the level of mid L4 vertebral body and below.
- Address L4-L5 disk space with angled instruments-NOT by table break
- Easiest is L2/3 and L3/4
- Not for L5/S1
- Cranially the T12 does not limit access as it is posterior to the disc space.
- The T11 rib will obstruct.
- Make an incision below T11 and use finger dissect through the diaphragm and sweep and push the pleura cranially to create space. After this make an incision between the 10 and 11 rib. can take rib down or push the ribs apart to get access to the disc space.
Contraindications
- Patients with severe osteoporosis
- Collapsed or fused disc space
- Patients with general infections
- Previous renal surgery
Anesthetic and neuromonitoring
- TIVA, no paralytics
- Make sure the MEP and EMG is working
Theatre set up
- This is the theatre set up for a left sided ExLIF
- Surgeon stands at the back of the patient
- II base infront of the patients
- Anesthetic team at the head.
- monitoring at the top and anterior to the patient
- So that surgeon can visualize both the Monitoring and II screen
- Bed set up
- Bed is turned 180 degree and move the head end and insert it to the end of the bed
- Get a narrow table to make it easy for C arm to move
Position
- Right lateral decubitus position
- left side elevated
- Patient position
- Place the breaking point of the bed between the greater trochanter and the iliac crest.
- Patient is kept as close to the edge of the bed
- easier for surgeon to look down into the dept of the surgical field
- This position keeps the bed rail from interfering with the C-arm images
- Bend the hip and knees by 90 deg to:
- Keep psoas lax
- Creates increased stability of the patient preventing body roll.
- The table and patient are laterally flexed to open the space between the iliac crest and the 12th rib.
- Place two towel roll at the
- Axillae: protect the brachial plexus
- Waist: between the contralateral rib and iliac crest
- Place two pillows between arms
- Place one pillow between knees
- The II is placed so that it is (do not change the angle of the II, only move the bed to get true lateral and true AP)
- Parallel to the floor
- 90 deg to the floor
- Adjust bed by tilting cranial caudal or laterally to make sure we have a true lateral x-ray
- AP fluoroscopic image to confirm true AP
- End plate is straight
- AP x-ray done in lateral position shows that the spinous process is middle between two pedicle
- Lateral x-ray done to make sure true lateral is shown
- The exiting foramen is clearly seen
- End plate is straight
- Tilt so that the disc of interest is 90 deg to the floor
- Tape
- Before taping make sure true lateral is obtained first
- 1st just caudal to iliac crest
- To keep skin taut
- To make sure the tape do not losen when bed is broken
- 2nd X shaped tape
- Start from greater trochanter → calf → under bed and across → corner of bed → over calf → under bed
- 3rd at Chest at nipple
- Get a C arm to check you have a true AP before taping the chest
- 4th straight across calf
- to prevent leg kicking during EMG stimulation
- At the end of positioning the skin over lying the flank needs to be taut enough to be straight when a horizon view is taken but soft enough that when the skin is palpated the skin can be indented.
- This is to allow the 3 abdominal muscle to be easily split
- Attach the clamp for the retractor holder anterior to patient at the level of the thoracic spine.
Mark skin
- Mark out
- Iliac crest
- the more cranial looking one is the contralateral one. Mark the more caudal one
- Ribs (11 and 12)
- 12 rib is hard to see as it is more vertical and should not block entry to disc space
- A. The 12th rib is short as compared to the others and is normally positioned behind L2-L3 bodies on lateral fluoro.
- B. The 11th rib can usually be found by crossing diagonally across the L1-L2 disc.
- Lateral border of the ipsilateral erector spinae muscle
- Anterior border of vertebral body (ALL)
- Posterior border of vertebral body (PLL)
- Mid point of the disc space
- When drawing this line extending much anterior and posteriorly.
- The angle of this line will tell you the direction of the AP xray to be done (to help guide the radiographer)
- The line between the ALL and PLL will be the lateral incision point
- Triangular area
- Borders: Iliac crest, Ribs lateral border of ipsilateral erector spinae muscle.
- Safe corridor for dissection to get under the abdominal wall muscle.
- Mark out the posterior lateral incision
- this will be within the triangular zone
- It is at the MCP joint of the surgeons finger when the tip of the index finger is located at the posterior 1/3 of the disc space
Skin incision
- Two options
- Single incision technique (Dr Tan)
- Make sure skin over lying the incision is taut enough so that the skin and underlying muscle can be split easily and the muscle fibres are easily visible
- Horizontal incision made in line with the skin marking.
- From ALL to PLL
- Monopolar through the subcut fat but not any deeper due to the iliohypogastric and ilioinguinal nerves
- Place retractors in to expose the External oblique fascia
- Stand at the leg end of the patient, use artery forceps to open up the fascia and split the external oblique muscle.
- Then split open the internal oblique followed by the transverse abdominus
- One can tell the difference in the muscle by the orientation of the muscle fibres
- The transverse abdominus fascia can be split using the artery and one will feel a drop into an empty space with fat.
- Two incision technique
- Posterior lateral incision
- Made as wide to fit the whole index finger
- Use finger and a closed dissecting scissor to blunt dissect between the quadratus lumborum and external oblique.
- Do not enter the quadratus lumborum muscle as it will make dissection very difficult.
- Open the dissecting scissor to widen the muscle opening for all 3 muscle fascia.
- Now one enter the retroperitoneal fat area
- Palpate for the ilium and sweep the peritoneum anteriorly.
- Palpate for the TP and then the psoas which is located at the floor of the incision.
- In more cranial cases: feel for the T11 rib and the diaphragm
- A finger is inserted in this incision to tent up the . transversalis facia. Then guide the lateral skin incision so that the abdominal muscle can be split
- Direct lateral incision made between the ALL and PLL
- Go through skin and fat but do not enter the muscle until the finger is placed under the transverse abdominius muscle
- Is the working incision
- Split the muscle using scissor along the direction of the muscle fibres
- External oblique
- Internal oblique
- Transverse abdominious
Trans-psoas dissection
- EMG
- Free run: Generally under GA, muscle does not produce any signal. However intraoperative irritation (Hammering, rubbing) can stimulate the muscle
- Triggered:
- Stimulation via electrical activity
- help determine nerve presence, proximity, continuity, and prognosis of function.
- Place the initial dilator and stimulate try to find the anterior femoral nerve, as the initial dilator traverse the psoas muscle.
- Make sure the initial dilator is anterior to the femoral nerve and is > 10mA away from the nerve
- Stimulation should be directed posteriorly where the femoral nerve is the closest
- The holder should be as close to skin as possible to prevent slipping
- If there is positive nerve stimulation or the nerve is anterior to the dilator 01or xray shows that it is not middle of the disc space or the 2/4-posterior 3/4 part of the disc space, take the dilator out and replaced it on the surface of the psoas before dissecting into the psoas again.
- Use the initial dilator to position it 90 deg to the psoas and get it at the middle (both anterior/posteriorly and superior/inferiorly) overlying the disc.
- Use Xray to confirm this
- Place a sharp long K wire through the Psoas within the initial dilator into the disc.
- Make sure that the needle is in the middle of the disc and that on AP xray it has passed over the midline. (check IOM)
- Push the initial dilator down just outside of the disc space and also place the external dilator over it so that both dilator is sitting on the disc space but it is docked over the vertebral body. (check IOM)
- Place the retractor over the dilator and get it within the muscle. (check IOM)
- Retractor placement
- Open retractor (check IOM)
- the retractor can have 3 or 4 leafs
- Two anterior and posterior
- Two Medial and lateral
- The retractor can have two pins that can be inserted into the upper and lower vertebrae to stabilize the retractor OR use a table stabilizer/holder
- Efficiency
- Time of retraction MOST IMPORTANT factor correlating with neurologic symptoms postop
- Uribe et al (Eur Spine Journal 2015)
- <30 minutes retraction time = less neuro comp risk
Discectomy
- Perform the discectomy using the Osteotome, disc shaver, and then rasper.
- Make sure that you are 90 degrees to the floor at all time so that we wont end up anterior (Aorta and IVC) or posterior (canal and cord)
- Make sure to get across to the contralateral side of the disc by puncturing the annulus with a Cobb and gentle pressure.
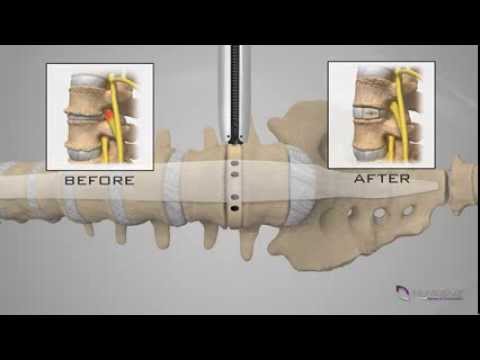
Implantation
- Gentle distraction of the disc space without damage the end plate
- Measure the cage
- The cage ideally needs to sit over the rim of the Endplate where it is the strongest.
- Cage selection
- Most commonly used width is 22 mm.
- The height and shape of the implant depend on many factors:
- Previous height of the disc space
- Osteophytes
- Condition of facet joints
- Deformities
- Cage filled with bone graft
- Cage insertion
- The use of correctly sized cages that reach the contralateral ring apophysis is recommended.
- important to strike the cage inserter properly until the desired position is reached
- A heavy impact can damage the endplate, causing subsidence of the cage.
- If when placing the trial cage it suddenly felt very loose could be 3 things:
- Trial cage in abdomen
- Trial cage in vertebral body
- ALL is torn
Post op plan
- For the first month after surgery, it is recommended that a brace is used to reduce the movements of the lumbar spine.
Tips and tricks
- Work in concavity of scoliosis so the disc space is all facing you and you can work though one incision
- If doing multiple levels do the cranial one first as when you add disc height the cranial vertebrae will move away from the surgical field
- At L4/5
- One do not absolutely need to be perpendicular to the disc space.
- One can used angled instruments
- At T12/L1 one can put the shim into the disc space and angle the retractor cranially as the T12 ribs will move away
- Relaxation of psoas muscle/plexus
- Minimize or use minimal table break
- Flex hip 30° and knees 90°
- If necessary, address L4–L5 disc space with angled instruments, not by table break
Complication
- Ghandi 2025
Complication | Prepsoas Studies (n = 20) | ㅤ | ㅤ | Transpsoas Studies (n = 39) | ㅤ | ㅤ | P value |
ㅤ | No. Of events | Total no. Of pts | Incidence, % (95% CI) | No. Of events | Total no. Of pts | Incidence, % (95% CI) | ㅤ |
Transient thigh or groin numbness/pain | 93 | 1795 | 8.7 (4.9-15.0) | 680 | 2352 | 21.7 (17.227.0) | 0.002 |
Transient hip flexor weakness | 18 | 1672 | 5.7 (3.9-8.2) | 262 | 1295 | 19.7 (14.6-26.0) | 0.001 |
Permanent motor neurological deficit [permanent neurological weakness] | 9 | 1801 | 1.0 (0.5-1.8) | 43 | 2842 | 2.8 (1.9-4.0) | 0.005 |
Sympathetic plexus injury | 11 | 412 | 5.4 (2.2-12.6) | 0 | 641 | 0.0 (0.0-3.2) | 0.03 |
Major vascular injury | 21 | 1772 | 1.8 (0.9-3.5) | 5 | 2709 | 0.4 (0.2-1.0) | 0.01 |
Peritoneal (bowel) injury | 3 | 1772 | 1.9 (0.6-5.5) | 3 | 1655 | 1.3 (0.5-3.8) | 0.64 |
Urological injury (kidney, ureter) | 1 | 1772 | 1.1 (0.3-3.9) | 0 | 1655 | 0.0 (0.0-0.9) | 0.05 |
Postop ileus | 16 | 1453 | 3.3 (1.0-10.2) | 15 | 1199 | 2.8 (1.3-5.9) | 0.79 |
Infection | 10 | 1766 | 1.1 (0.6-2.0) | 13 | 1807 | 3.1 (1.9-5.1) | 0.01 |
Hematoma (psoas, subcutaneous) | 14 | 1398 | 1.5 (0.9-2.5) | 5 | 1196 | 1.7 (0.7-3.9) | 0.13 |
Subsidence | 56 | 241 (566*) | 12.2 (5.6-24.7) | 201 | 761 (1537*) | 13.8 (9.4-19.7) | 0.78 |
Pseudarthrosis | 24 | 120 (262*) | 9.9 (4.1-21.7) | 103 | 796 (1275*) | 7.5 (4.9-11.4) | 0.57 |
Nerve injury
Complication | No. of Events | Total No. of Pts | Incidence, % (95% CI) |
Transient thigh or groin numbness/pain | 680 | 2352 | 21.7 (17.2–27.0) |
Transient hip flexor weakness | 262 | 1295 | 19.7 (14.6–26.0) |
Permanent motor neurological deficit | 43 | 2842 | 2.8 (1.9–4.0) |
Sympathetic plexus injury | 0 | 641 | 0.0 (0.0–3.2) |
Lumbar plexus injury
- Mainly anterior thigh leg weakness, numbness
- Generally due to swelling of the psoas causing transient femoral nerve deficit
- If one can see the nerve, one is more likely to cause traction neuropraxia to the nerve
- can take weeks to months to recover
- Use the direct nerve probe to test the nerve throughout the case. Initially the nerve would be stimulated <5mA. Later on during the case if there is injury to the nerve then the stimulation will drop since the nerve is not functioning. If you see this during the case just remove the retractor and give time for the nerve to recover.
- Very rare transect the nerve
- Safe zone to prevent nerve injury
- Requires thorough knowledge of lumbar plexus anatomy.
- "Safe zones" defined for entry, typically anterior to the lumbar plexus within the psoas muscle.
- The genitofemoral nerve, a sensory nerve, is ventral to Zone 3.
- The “safe zone” (zone III) is depicted in green and is the recommended trajectory through the psoas to reduce lumbar plexus and femoral nerve injury.
- Lumbar plexus injuries. Ahmadian 2012
- A: Anterior views demonstrating a lateral abdominal hernia found 6 weeks postoperatively. Findings were associated with anesthesia of the superior-lateral portion of SDZ I.
- B: Anterior view demonstrating significant muscle atrophy of the right lower extremity evident 18 months postoperatively, with associated anesthesia of SDZ III consistent with complete femoral nerve injury.
- C: Lateral view outlining postoperative anesthesia (SDZ II) consistent with LFCN injury.
- D: Anterior view outlining complex combined lumbar plexus injury with dermal anesthesia of SDZ II, paresthesia of SDZ III (sparing the saphenous dermatome), and neuropathic inguinal allodynia and regional anesthesia of SDZ I.
- E: Lateral view demonstrating anesthesia of the lateral portion of SDZ I consistent with injury to the lateral cutaneous branch of the iliohypogastric nerve.
- Sensory dermal zone (SDZ) -Ahmadian 2012
Nerves | Cutaneous/Sensory innervation | Motor innervation | Clinical syndrome | Injured |
iliohypogastric | ant/lat cutaneous branches | transversus abdominis, internal oblique | Zone I | Approach through the abdominal wall |
ㅤ | lower abdomen/mons pubis/upper gluteal | ㅤ | ㅤ | ㅤ |
ilioinguinal | ant scrotal/labial branches (male/female) | transversus abdominis, internal oblique | Zone I | Approach through the abdominal wall |
ㅤ | labium majus/scrotum sensation | ㅤ | (+/−) loss of cremasteric reflex | ㅤ |
ㅤ | upper medial thigh sensation | ㅤ | ㅤ | ㅤ |
subcostal | lower abdomen/flank | rectus abdominis, external oblique | Zone I | Approach through the abdominal wall |
genitofemoral | genital branch | cremaster | Zone I | Approach through the abdominal wall |
ㅤ | labium majus/scrotum sensation | ㅤ | (+/−) loss of cremasteric reflex | ㅤ |
ㅤ | femoral/lumboinguinal branch | ㅤ | ㅤ | ㅤ |
ㅤ | upper anteromedial thigh sensation | ㅤ | ㅤ | ㅤ |
LFCN | lat thigh sensation | none | Zone II | Aggressive dissection of the retroperitoneal adipose tissue. |
obturator | cutaneous branch | adductor longus, adductor magnus, obturator externus, gracilis, pectineus | Zone IV | On the psoas |
ㅤ | lower medial thigh sensation | ㅤ | (+) leg adduction | ㅤ |
femoral | ant cutaneous branches | iliopsoas, pectineus, sartorius, quadriceps femoris | Zone III | On the psoas and dissection of retroperitoneal fat |
ㅤ | anteromedial thigh/leg sensation | ㅤ | (+) loss of patellar reflex | ㅤ |
ㅤ | saphenous | ㅤ | (+) hip flexor weakness | ㅤ |
ㅤ | medial leg sensation | ㅤ | (+) knee extension weakness | ㅤ |
ㅤ | ㅤ | ㅤ | (+) lat thigh rotation | ㅤ |
- SDZ I—iliohypogastric, illioinguinal, genitofemoral, and subcostal nerves
- SDZ II—LFCN
- SDZ III—femoral nerve;
- SDZ IV—obturator nerve.
Genitofemoral nerve injury
- Burning or shooting pain, but it may also present as itching, tingling, stabbing, or sharp pain
- Most common are transient thigh symptoms (numbness, paresthesias, dysesthesias) (0%-75%).
- Femoral nerve and other motor injuries are less common (0.7%-33.6%), with a systematic review finding 2.8% permanent motor neurological deficit for ExLIF vs. 1.0% for OLIF.
- Use of rhBMP-2 and ≥ four-level LLIF procedures were associated with higher risk of postoperative deficit.
Abdominal wall paresis
- Aka "pseudohernia"
- Due to iliohypogastric or ilioinguinal nerve injury, usually recovers spontaneously.
Wound infection
- Rates - Uribe 2015
Superficial wound infection | 35 (0.27 %) |
Deep wound infections | 18 (0.14 %) |
Vascular injury
- Rates - Uribe 2015
Vascular complications, n (%) | 13 (0.10 %) |
Visceral complications, n (%) | 11 (0.08 %) |
Other interbody fusion comparisons
- OLIF vs. ExLIF Approach Comparison:
- Transpsoas group had higher rates of transient thigh/groin sensory symptoms and transient hip flexor weakness, and increased prolonged motor deficits.
- Prepsoas group had higher rates of sympathetic plexus injury (none in transpsoas) and higher rates of major vascular injury.
- Rates of bowel and urological injury were similar.
- ExLIF vs ALIF
- Smith et al. (J Clin Neuro 2012)
- 1–2 level XLIF (115 patients): 36 and 43 hour LOS.
- 1–2 level ALIF (87 patients): 72 and 96 hour LOS.
- From lecture
- Reported ALIF complications
- Visceral: 5% - 13.9%
- Vascular: 2.2% - 6.7%, as high as 18%
- Reproductive: 9.6% (in males)
- Reported XLIF complications
- Visceral: <1%
- Vascular: <1%
- Reproductive: <1%
- ExLIF vs PLIF
- Length of stay
- Lucio et al 2012 (Risk Management and Healthcare Policy 2012)
- 2-level XLIF (109 patients): 1.2 day LOS.
- 2-level open PLIF (101 patients): 3.2 day LOS.
- Rodgers et al 2010. (Spine 2010 – Fusion in Octogenarians)
- XLIF (40 patients): 1.3 day LOS.
- Open PLIF (20 patients): 5.3 day LOS.
- Neurological deficit
- TLIF/PLIF: 3-9.6%
- ExLIF: 0.7-2.9%
Outcome
- Reoperation rates
- XLIF (no additional fixation): Ozgur et al. (SAS J 2010) – 0% reoperation rate; Rodgers et al. (Spine 2010) – 5%.
- XLIF with MIS fixation: Isaacs et al. (Spine 2010) – 0% re-operation rate.
- XLIF with open fixation: Isaacs et al. (Spine 2010) – 0% re-operation rate.
- XLIF (unspecified fixation in title, individual series):
- Hyde et al. (WSCJ 2011): 2.6%
- Rodgers et al. (Spine 2011): 1.8%
- Knight et al. (JSDT 2009): 1.7%
- Youssef et al. (Spine 2010): 0%
Images
Video

Evidence
- Cheng 2015:
- Comparing:
- Traditional transpsoas (TP) approach:
- Dissection is performed through the psoas using neuromonitored sequential dilation, without direct visualization of the psoas during dilation.
- Direct visualization (DV) approach:
- Retractors are initially docked superficial to the psoas, and the surgeon then performs a directly visualized dissection through the psoas with identification of the lumbar plexus before placing retractors deep within the psoas.
- Overall adverse events
- Any postoperative adverse event occurred in 25.8% of patients (31/120), with 36 total events recorded; 1.7% required unplanned return to theatre and there were no deaths.
- Neurologic adverse events (thigh dysesthesias, radiculopathy, weakness) occurred in 18.3% overall, and 98.2% of patients were independently ambulant at first postoperative follow‑up.
- TP vs DV: neurologic AEs
- Considering all levels, neurologic AEs occurred in 24.0% of DV cases versus 14.2% of TP cases (not statistically significant at this sample size).
- For single-level fusions, neurologic AEs were significantly higher with DV (28.6%) than TP (10.2%, p ≈ 0.03), suggesting TP with neuromonitoring may better limit plexus-related morbidity in this context.
- Most common neurologic complaint was
- Anterior/lateral thigh paresthesia (12.5%),
- Radiculopathic leg pain (5.0%) and postoperative weakness (2.5%).
- Overall AE rates with the lateral approach (≈26%) were comparable to published complication rates for anterior and transforaminal lumbar interbody fusion techniques, indicating that lateral transpsoas fusion has a nontrivial but similar risk profile to established approaches.
- Tohmeh 2011:
- 102 patients undergoing XLIF at L3–4 and/or L4–5 found that dynamic, directionally sensitive, threshold-based EMG (NeuroVision) reliably identifies the lumbar plexus during the transpsoas approach and is associated with a low rate of persistent neural injury
- Nerve detection
- Alert-level feedback (≤10 mA) indicating nerve proximity occurred in 53.9–55.7% of cases overall, more often at L4–5 than L3–4.
- Complications
- Intraoperative complications were rare, with 2 minor peritoneal perforations (1.96%) not requiring repair.
- Transient approach-related deficits were common but self-limited: 27.5% had new iliopsoas/hip flexion weakness (typically MRC 4/5) and 17.6% had new upper medial thigh sensory loss, both usually resolving within ~2 weeks and attributed to psoas trauma rather than nerve injury.
- True new motor neural deficits occurred in 3 patients (2.9%)—one foot dorsiflexion weakness and two quadriceps weaknesses—all resolved by 6 weeks to 6 months; in two of these, non-alert thresholds were present and free-run EMG changes correlated temporally with implant manipulation or difficult revision surgery.
Pros and cons
Pros
- Benefits of minimally invasive surgery (MIS)
- Less morbidity
- less infection
- Reduce blood loss
- Less pain
- Shorter hospital stays
- Faster recovery
- Avoiding the morbidity of a transperitoneal approach.
- Larger surface area for intervertebral graft positioning → higher fusion rate
- Alignment advantages
- Powerful coronal correction
- Modest sagittal correction
- ALL release (ACR) allows more correction
Cons
- Lumbar plexus injury
- Sensory: 36%
- Motor: 5% (femoral nerve injury)
- Might not achieve adequate sagittal correction
- Needs lateral positioning
- Takes time
- Neuro-monitoring required
- Vascular injury
- Learning curve
- Limited approach can only access L1-L5 (mainly L2/3 and L3/4)
- As the most proximal and most distal of those disc spaces may be difficult to enter due to ribs and iliac crest
 Made with Bullet